GUIDE
Carbon fibre cutting patterns for compound curves
How to flatten carbon fibre cloth over a compound-curved mould: what the cloth actually does, why a CAD flatten is not the answer, and how to get a pattern that lands on the tool without bunching.
What woven carbon does on a curve
A tow of carbon is, for practical purposes, inextensible. A woven cloth therefore has exactly one way to change shape in its own plane: the warp and weft rotate at their crossings, and the little squares of the weave become rhombuses. This is trellis shear, and it is the entire mechanism by which cloth conforms to a double curvature.
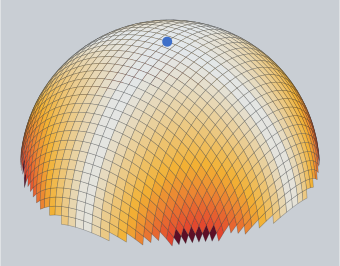
On a dome, a circle drawn around the crown at some distance along the surface has less circumference than the same circle on a flat sheet. The cloth has too much material going round, and the crossings close up to absorb it. On a saddle the circle has more circumference than the flat sheet, and the crossings open. Either way the shear grows with distance from wherever the cloth was laid first, and it is largest on the diagonals between the warp and weft directions, where neither family of tows can run along the curvature.
Why flattening the CAD surface does not work
CAD flattening, sheet-metal unfolds and the flatten tools in illustration software all model an isotropic sheet: something that can stretch a little in any direction and does not care which way is which. Applied to a non-developable surface they either refuse, split the surface along seams of their own choosing, or spread the distortion evenly and quietly. None of that is what cloth does. Cloth distorts by shear only, along the fibre directions only, from the seed outward. The shape that comes out is different, and it is different most at the corners, which is where a rectangle cut for a crowned panel comes up short or bunches.
The draped pattern is a different object. Every crossing in the net on the part corresponds to a crossing in the undeformed cloth, one pitch from its neighbours along the warp and weft. Map the outline of the net back through that correspondence and the cut shape appears: the four-lobed disc for a dome, the pulled-in cross for a saddle.
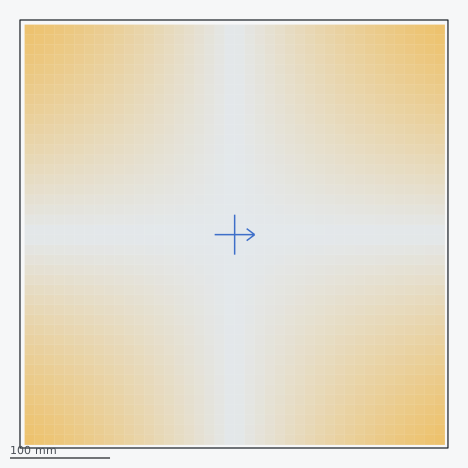
What changes the pattern
- The seed. Where the cloth is put down first. The pattern is for a layup that starts there and works outward; start somewhere else and the cloth will not go where the pattern says. Put the seed deep in the part.
- The warp direction. Turning the cloth 45° on the same part gives a different net and a different pattern, because the diagonals of the weave are now where the axes were. The fibre angle in the laminate schedule is set here.
- The locking angle. Where the tows jam and the cloth buckles instead of shearing further. A plain weave locks around 30°, a 2×2 twill near 45°, satins later. Cells past lock are marked on the pattern; a satin weave, a dart or a second ply are the ways out.
- Tow pitch. The link length of the net. It sets the resolution of the pattern and barely changes its shape.
Darts, splits and overlaps
When a single ply cannot cover the part inside its locking angle, the cloth has to be cut. A dart removes a wedge where the cloth would bunch; a split lets two regions shear independently; a second ply with an overlap covers what the first could not reach. The simulation makes the choice visible: the red cells show where, and the coverage figure shows how much of the part a ply from a given seed reaches. DrapeCut's Cover with pieces lays pieces of the ply from separate seeds and trims each to its own ground with an overlap you set.
Doing it
- Export the mould surface as STEP or STL.
- Upload it, seed the net where the cloth goes on first, set the warp angle to the ply's fibre angle.
- Pick the weave, check the shear map, move the seed or turn the warp if the red is somewhere it matters.
- Download the DXF and cut it.